webpack打包例子
源码地址https://github.com/manlili/webpack_learn里面的lesson03
第一步
在空白的文件夹正确的安装webpack,这一步webpack入门指南已经讲过了。
然后创建源文件夹src,在src下面创建script和style文件夹用来盛放我们的测试原文件,比如js和css,然后创建个目标文件夹dist,用来盛放打包生成的文件
第二步
在根目录下面创建index.html,内容是:
接着在src/script文件创建main.js,内容是:
接着在src/script文件创建test.js,内容是:
第三步
配置webpack的打包配置文件webpack.config.js,内容如下:
上面的配置意思是将main.js打包到bundle.js
接下来来看下我们的文件夹组成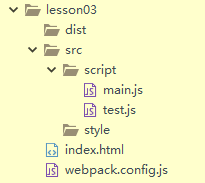
第四步
在根目录下打开命名行输入
上面的过程是在根目录下面寻找webpack.config.js,然后按照配置进行打包.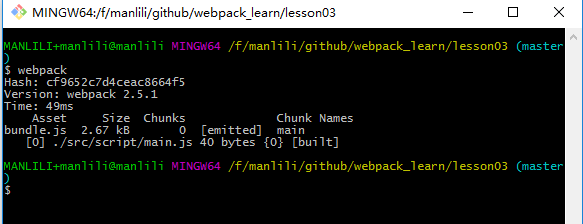
这时我们就会看到dist下面多了个js文件夹,并且js文件夹里面多了个bundle.js,我们来看下文件目录: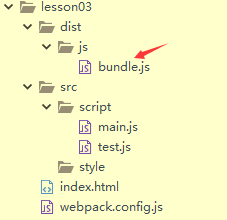
下面我们来看下bundle.js内容(以后都省略打包自动生成的webpack代码)
上面我们可以看出生成了一个chunk,0代表第一个chunk
第五步
将两个js文件打包成一个js,此时我们只需要修改webpack的打包配置文件webpack.config.js,内容如下:
在根目录下打开命名行输入
出现:
注意上面生成了3个chunks,每个chunks的详细内容都标的很清楚,接着我们发现打包生成的bundle.js内容改变了
从上面生成的代码看出正好对应着打包运行时生成的3个chunks,其中第三个chunk是将两个不相干的模块_webpack_require(0)与webpackrequire__(1)联系起来。
第六步
假设我们需要将两个文件打包完分别输出各自的打包文件,webpack.config.js里面entry就不能用字符串或者数组的方式,就需要用对象的方式,我们修改webpack.config.js文件内容是:
在根目录下打开命名行输入
出现: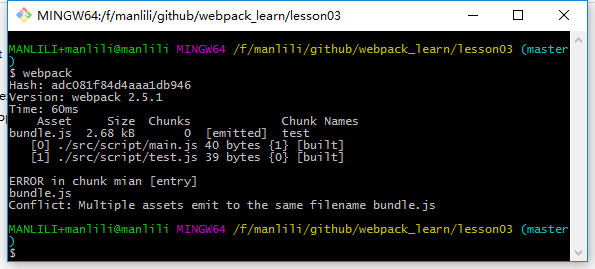
此时上面出现报错,把这个写出来主要是想说明,如果entry用对象的方式写出来,打包生成的是多个文件,我们上面将output写死输出一个bundle.js很明显是不正确的,这时生成的错误bundle.js文件内容是:
咦?上面我们明明是将main.js和test.js两个打包,最后生成的bundle.js却只有test.js里面的内容,原因是因为覆盖,先打包main.js,然后test.js打包完将mian.js打包结果覆盖掉了,这时我们就需要用到动态命名
我们修改webpack.config.js文件内容是:
其中hash是整个文件打包的hash,chunkhash是打包生成的文件hash,如果两次要打包的文件内容无任何修改,那么两个打包的hash,以及chunkhash是不变的,
但是如果我改了其中一个要打包的文件程序,比如修改了main.js内容,再次打包,整个文件的hash会变,打包生成的main.js的chunkhash就变了,但是打包生成的test.js的chunkhash不变,这样我们实际项目如果只发版修改的文件,只要比较chunkhash是就可以了。
在根目录下打开命名行输入
出现: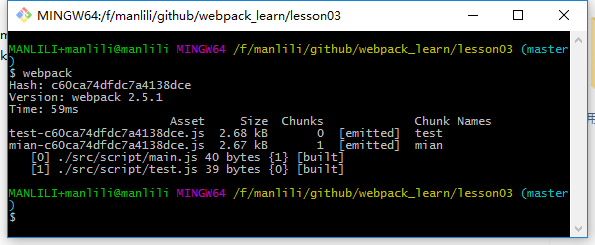
这个时候我们发现dist/js文件下面生成
mian-c60ca74dfdc7a4138dce.js和test-c60ca74dfdc7a4138dce.js,其中mian-c60ca74dfdc7a4138dce.js内容是
test-c60ca74dfdc7a4138dce.js内容是:
第七步
源码地址https://github.com/manlili/webpack_learn里面的lesson04
紧接着上面的六个步骤,下面介绍下使用plugins,这里介绍html-webpack-plugin插件,在根目录下面打开命令行执行:
就会发现package.json多了
然后在webpack.config.js里面配置下plugin
在根目录下打开命名行输入
出现: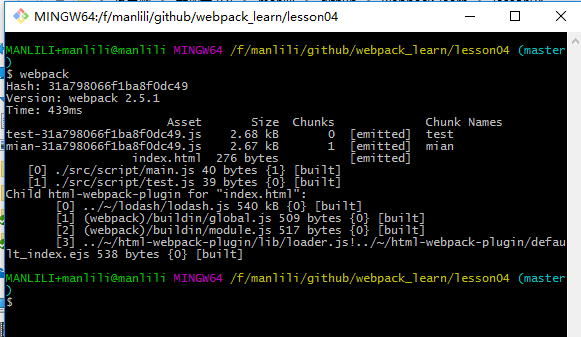
从图上的结果我们可以发现使用了html-webpack-plugin进行打包,这时发现dist/js下面多了
index.html, mian-31a798066f1ba8f0dc49.js,test-31a798066f1ba8f0dc49.js,细心的就会发现比前面的六步多了个index.html,
下面来看下index.html的代码:
竟然是自动引入打包后的test-hash名字.js和mian-hash名字.js,当然这都是html-webpack-plugin的功劳,但是实际项目中html并不是自动生成的,而是需要我们自定义html,然后打包生成固定的html,也就是以根目录下面的index.html为模板,生成dist下面的index.html.
下面来看下我们根目录的index.html文件内容:
然后在webpack.config.js里面配置下plugin
在根目录下打开命名行输入
发现dist/js文件下index.html内容改变为:
这时生成的index.html是根据根目录下面的index.html生成的。
但是此时生成的index.html在dist/js文件下,我们想根据js和html分类放置文件,可以修改webpack.config.js
在根目录下打开命名行输入
发现dist下面打包生成的js和html已分类,如下图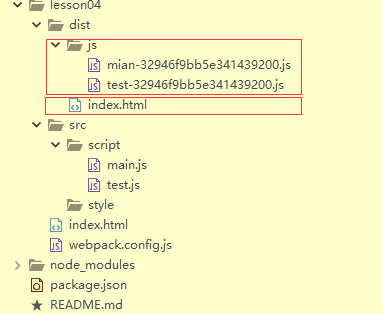
下面再来介绍下html-webpack-plugin的其他options,直接就写在webpack.config.js注释里面
关于minify参数可以看minify官网介绍
在根目录下打开命名行输入
会发现生成index-0c16345fd56a0ca2d11b.html,内容是:
第八步
有时候我们想让plugin与将要打包的模板产生交互,这个时候就需要用到EJS语言,这个不懂的就自己去百度,源代码在
源码地址https://github.com/manlili/webpack_learn里面的lesson05
下面我们来看一下怎么让他们产生交互,假设我们想让根目录index.html下面的模板调取webpack.config.js里面plugins的title,下面我们就需要在根目录index.html用EJS:
在根目录下打开命名行输入
发现dist文件夹下面生成的index.html内容是:
从上面代码可以发现名字改变了,取得是webpack.config.js里面plugins的title。如果我们想进一步在根目录下面的index.html获取webpack.config.js里面plugins的全部options,这时候需要在根目录index.html用EJS:
在根目录下打开命名行输入
发现dist文件夹下面生成的index.html内容是:
上面需要注意的是htmlWebpackPlugin.files.chunks.模块名.entry是打包生成的chunks路径,这个后面深入讲解的时候需要用到。
关于html-webpack-plugin插件各种参数,它的官网讲的很清楚,自己可以点开链接查看。
下面来讲下htmlWebpackPlugin.files.chunks.模块名.entry,我们知道了路径就可以直接使用,比如在根目录index.html用EJS:
此时为了看这个效果需要将webpack.config.js中inject关闭一下,这样就不用将生成的js文件插入到生成的index.html中,专门测我们用htmlWebpackPlugin.files.chunks.模块名.entry写进去的引入方式
在根目录下打开命名行输入
发现dist文件夹下面生成的index.html内容是:
果然像我们预测那样,直接将生成的js插入了head那里。
如果我们想将打包后的html引入的js换成线上的地址,这个时候需要给output配置publicPath,webpack.config.js内容修改为:
在根目录下打开命名行输入
发现dist文件夹下面生成的index.html内容是:
从上面我们可以看出引入的是我们配置的publicPath地址,即线上的地址。
第九步
源码地址https://github.com/manlili/webpack_learn里面的lesson06
前面讲的都是单页面打包,下面我们对多个页面生成多个页面的方法举例说明一下:下面需要在src/script/下面创建多个待打包的js,比如a.js,b.js,c.js,d.js,这些js里面随便写一点js脚本就行,下面来看下整个目录: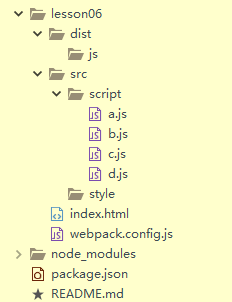
接着需要修改webpack.config.js内容为:
在根目录下打开命名行输入
发现dist文件夹下面生成的目录如下: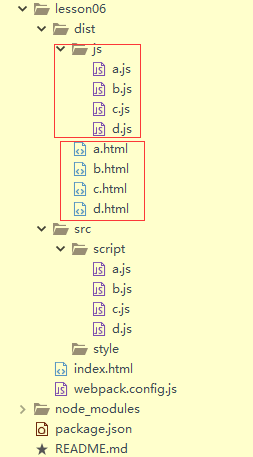
这里就不贴出来每个文件的代码了,打包结果是正确的。但是这个时候发现a.html里面引入的是打包后的a.js,b.js,c.js,d.js, b.html,c.html,d.html也是,下面来看下打包后的a.html内容如下:
这与我们预期在打包后的a.html只引入a.js,b.html只引入b.js,c.html只引入c.js,d.html只引入d.js,这个时候就要去看html-webpack-plugin里面的chunks和excludeChunks:
(1) chunks: 指定载入哪些chunk到打包生成的html页面
(2) excludeChunks: 指定排除哪些页面将剩下的chunks载入到打包生成的html页面
接着需要修改webpack.config.js内容为:
或者
在根目录下打开命名行输入
发现dist文件夹下a.html只引入a.js,b.html只引入b.js,c.html只引入c.js,d.html只引入d.js,达到我们的预期。
第十步
源码地址https://github.com/manlili/webpack_learn里面的lesson07
我们都知道当html页面引入多个js的时候就需要多次向服务器发送请求,这样会增加带宽消耗和时间消耗,如果我们追求极致的话,其实是可以将共用的js源码直接写在html,不共用js再外链引入,这样可以节约一点时间和带宽,下面来重点讲解一下:
之前插件html-webpack-plugin并没有考虑这种内联情况,但是庆幸的是插件的作者给出了在webpack里面打包的解决方法,传送门,首先根据官网给的例子改写我们的模板index.html:
上面是将test.js作为内联js嵌入每个打包生成的html里面,紧接着为了跟外链js作比较,可以在打包生成的a.html只引入a.js,b.html只引入b.js,c.html只引入c.js,d.html只引入d.js,
然后修改webpack.config.js内容
在根目录下打开命名行输入
发现dist文件夹下面生成a.html内容是:
通过上面的代码我们可以看出,test.js内嵌在了a.html,并且通过引入了a.js,到此为止也算是将plugin大部分讲透彻了。